Difference between revisions of "COMP 3000 2011 Report: Qimo"
| Line 20: | Line 20: | ||
==== Installation ==== | ==== Installation ==== | ||
Clicking install brings up the Qimo splash screen. A list of languages given to choose from. It immediately started setting up the clock, and showed a progress bar. It tried to detect my timezone, but did so incorrectly. The time was an hour earlier than it was meant to be. My city wasn't an option for the time zone, so I chose an equivalent one. | |||
I was then given the option to choose a keyboard layout. Following this was the step to prepare the disc space. I could either use the entire disk or create partitions. Then was the creation of user accounts and naming of the computer. I was given the optional advanced option to disable installation of the boot loader and apply a network proxy. | |||
After this was a progress bar indicating how far the installation had proceeded. Above the progress bar was a changing dialog providing the user with information on Qimo, explaining its features and purpose. | |||
== Basic Operation == | == Basic Operation == | ||
Revision as of 11:07, 18 October 2011
Background
The name of the chosen distribution is Qimo; officially Qimo For Kids. It is a modified version of Ubuntu made especially for kids. It's goal is to make it very user friendly, enough to be used by someone as low as 3 years old. It's meant to introduce computers to kids and provide educational opportunities through programs and games.
It's made by Michael and Michelle Hall. It can be obtained at the Qimo website, http://www.qimo4kids.com. The ISO is over 700 MB in size, and it can run the OS without installation. Installation of the OS takes ___ MB of hard drive space.
Installation/Startup
After mounting the ISO and starting up the device, I was first given option to choose my language. Immediately after that I was given many options from the ISO.
- Try Qimo without any change to your computer
- Install Qimo
- Check disc for defects
- Test memory
- Boot from first hard disk
Try Qimo
Clicking the first option brings you to a splash screen of Qimo, and then the loading screen appeared. It was simply a black screen, not very informative (I guess to not confuse kids). Then it loaded up.
This option provided the full version of the OS, however any changes made are not permanent. Creating files or progress in game is lost when shut down.
Installation
Clicking install brings up the Qimo splash screen. A list of languages given to choose from. It immediately started setting up the clock, and showed a progress bar. It tried to detect my timezone, but did so incorrectly. The time was an hour earlier than it was meant to be. My city wasn't an option for the time zone, so I chose an equivalent one.
I was then given the option to choose a keyboard layout. Following this was the step to prepare the disc space. I could either use the entire disk or create partitions. Then was the creation of user accounts and naming of the computer. I was given the optional advanced option to disable installation of the boot loader and apply a network proxy.
After this was a progress bar indicating how far the installation had proceeded. Above the progress bar was a changing dialog providing the user with information on Qimo, explaining its features and purpose.
Basic Operation
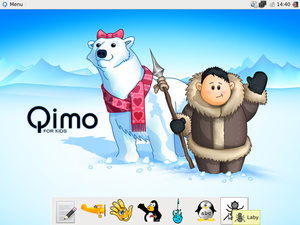
At the bottom is very big, childish looking icons. Text editor, "gCompris" which is some sort of __, "child's play" which is some sort of ___, "tux paint" which is a childrens version of paint, "tux math" which is a bunch of ___, "tux type" which is a __, "laby" which is a labyrinthe program that seems to teach kids programming, making each step in the labyrinth a function call in python.
Usage Evaluation
References
TODO: http://www.qimo4kids.com/ http://distrowatch.com/table.php?distribution=qimo
