COMP 3000 2011 Report: PuppyLinux
Part 1
Background
Name:
Puppy Linux
Goals (taken from PuppyLinux website About Puppy Linux):
- Save space with its 100 MB size and runs on most machines since off RAM
- Easy to install Zip, USB or hard drive media
- Booting from CD (or DVD), the CD drive is then free for other purposes.
- Booting from CD (or DVD), save everything back to the CD.
- Booting from USB Flash drive, minimize writes to extend life indefinitely.
- Extremely friendly for Linux newbies.
- Boot up and run extraordinarily fast.
- Have all the applications needed for daily use.
- Will just work, no hassles.
- Will breathe new life into old PCs
- Load and run totally in RAM for diskless thin stations
Target Audience:
With Puppy Linux's low hardware requirements to be able to run it, one of its major target audiences is towards users with low-end hardware or old computers that are looking to revive their aging machines - especially since the OS is run totally in RAM. Although, it is also intended for users who just want a small distribution that packs a lot of punch in a small size.
Developer:
Barry Kauler
Obtained:
You can download the .iso file off his website Download Puppy
Approximate Size:
~129MB
Heritage:
Puppy Linux 5.0 and later versions are built off binaries from Ubuntu Linux 10.04 (Lucid Lynx). This is the reason for the latest release being named Lucid Puppy.
Installation/Startup
 |
 |
 |
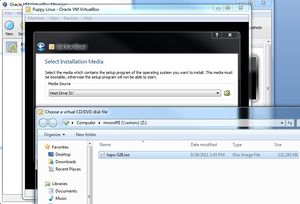
To initialize the Puppy Linux distribution, we downloaded the latest .iso from the puppy-5.2.8 folder. The iso was then booted up with VirtualBox (Figure 1):
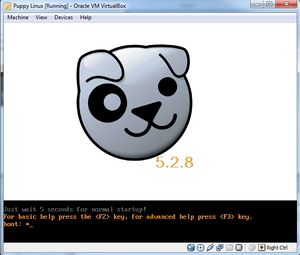
VirtualBox started loading Puppy Linux and a console appeared allowing the user to use more advanced boot options. If nothing is entered by the user then the operating system is loaded into RAM. Since Puppy Linux is run on RAM, during boot the OS will look for a save file from the user's previous session called 'pup_save.2fs-file'. If it doesn't exist, then a new one will be created after the user is prompted for their personal settings. If the boot option 'puppy pfix=ram' is used, then the OS ignores a previously saved 'pup_save.2fs-file' settings file. In this picture, no boot options are selected and the the OS will boot normally (Figure 2):
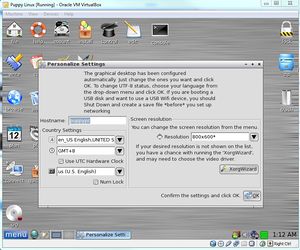
When the distribution is first loaded by a user, the OS asks for their settings which are then saved either onto a hard drive or external storage such as a CD/DVD/USB drive as 'pup_save.2fs-file'. This file contains information including the machine's hostname, screen resolution and country/time settings (Figure 3):
Basic Operation
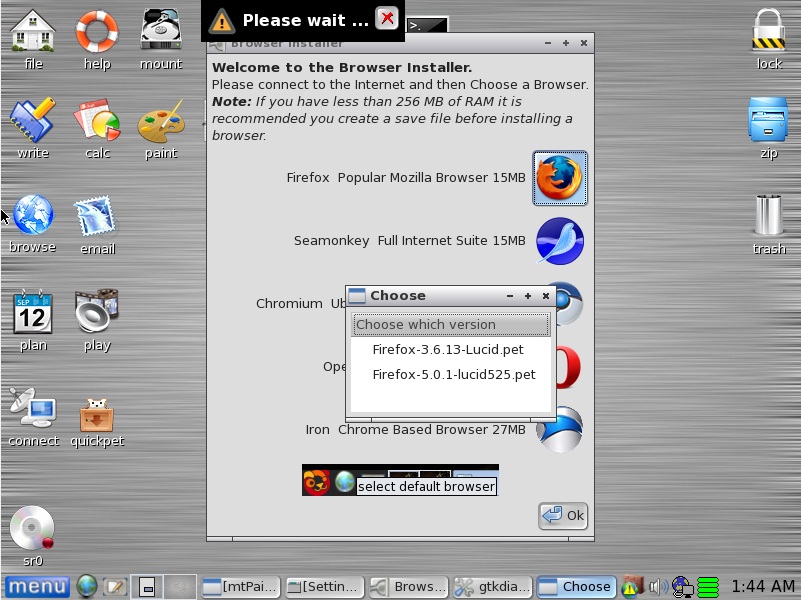
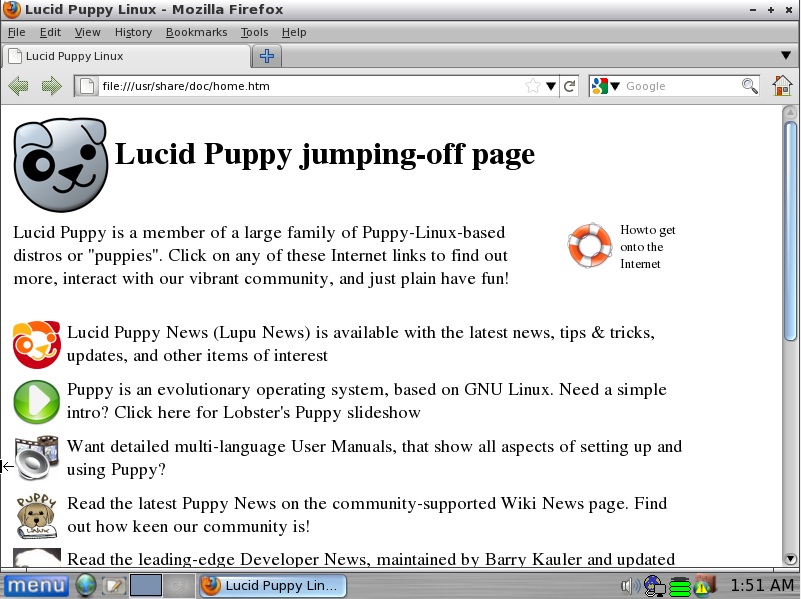
The first thing I would do if I was using this easy-to-use distribution would be to fire up an internet browser, mainly Firefox. One purpose for reviving old machines would be to make it usable to the average user and these user's would definitely want access to the web. Puppy Linux doesn’t come pre-installed with any internet browsers but when you click the “browse” icon it gives you the option to install one of five browsers (Firefox, Seamonkey, Chromium, Opera, and Iron). Of course, you have to be connected to the internet to download one of these browsers. Once one is clicked, it is downloaded and automatically installed by the OS. After clicking on the Firefox icon, Puppy Linux prompted me to select which version of Firefox I wanted:
Once it was installed, it launched the default Lucid Puppy page and I was able to use Firefox and surf the internet easily. The main page even comes with links for the user to explore the latest news, updates or documentation about Puppy Linux to get more acquainted with the OS.
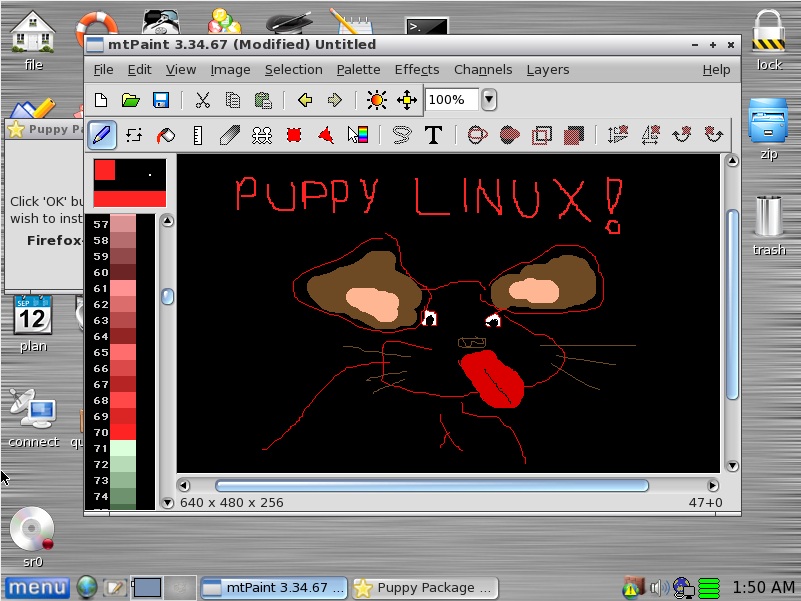
We also tested the pre-installed image editor mtPaint and easily managed to create a drawing dedicated to our new favourite Linux distribution:
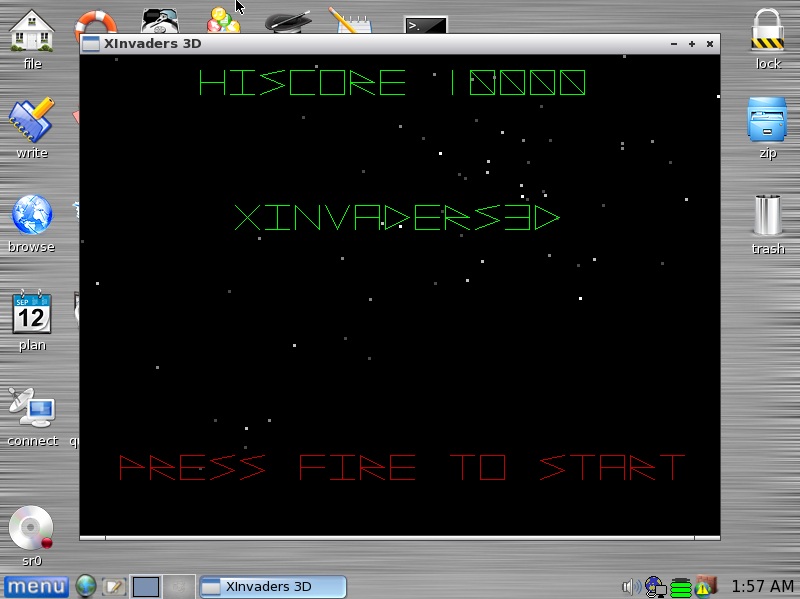
Of course, another essential application to test is one of the pre-installed games called XInvaders 3D which is basically a 3D version of the old arcade game invaders. After much testing and intricate study, we were able to attain a high score of 10,000:
After all the testing and exploring we did with Puppy Linux, we realized that there was one large bug that came with it. The cursor gets out of sync between the Virtual OS and Windows when you move the cursor outside of the Virtual environment. It seems like this is only evident when the OS is loaded inside a virtual environment, but we could not find any other instances of this problem occurring to other users when searching online. It’s not clear if it would be fixed if the OS was installed directly onto the machine but further testing would need to be done:
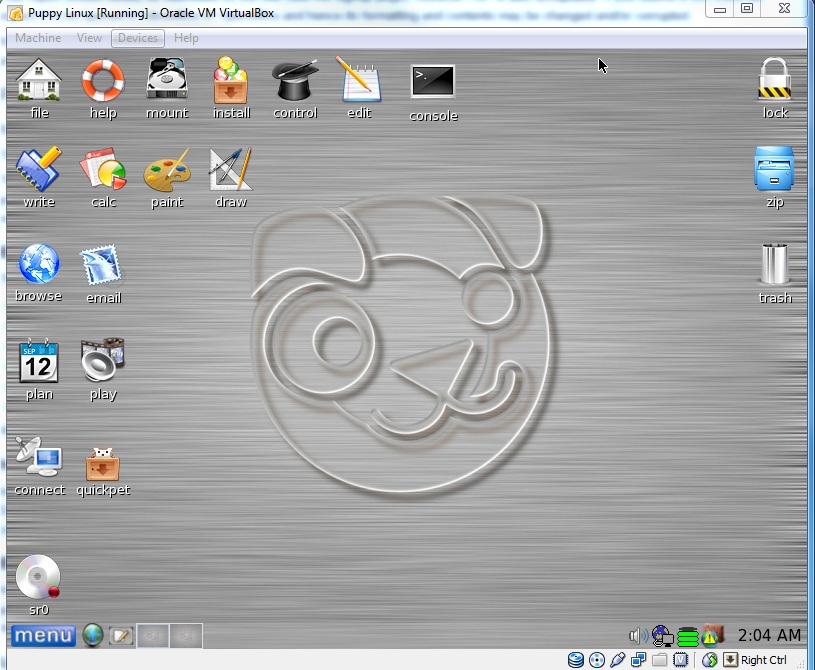
Screenshots do not capture the Windows cursor but as you can see the tab “Devices” is being hovered over in Windows while the cursor is all the way on the right in the Virtual Machine. This problem got annoying when trying to reach icons that are close to edge of the window inside the virtual environment, but is fixable if you play around with the mouse to get the locations of both cursors to be close enough together.
Usage Evaluation
Puppy Linux is very easy to use for a novice Linux user and would be ideal for people who want to revive old machines that don’t have much computing power. I found it simple enough that it wouldn’t overwhelm the user with configuration problems or unnatural interfaces. Although, it is also flexible and extensible with many programs so that power Linux users would be able to make great use of its pre-installed applications such as ftp, ssh, irc and IM clients.
I think the look of the user interface isn't very attractive, but that's not really the goal of Puppy Linux. It achieves everything it tries to attain to by bringing lots of applications and power in a small operating system. There are applications for pretty much any basic use you would use a desktop for. AbiWord for documents, which supports Office 2007 documents and has Computer Modern fonts, PSIP VoIP software, Gnumeric spreadsheet, Ayttm IRC software, Pmount to mount drives (including NTFS and USB-attached devices) and even a few games.
It also comes with GParted, VPN, firewall, Sylpheed mail clients, Pstreamvid, and a helpful downloader script called Quickpet that lets you find and install some of the more popular software circling the net these days. This software includes GIMP, Audacity, desktop widgets, WINE, Songbird, the HTML editor KompoZer, frameworks such as Java, drivers for modern graphics cards (including Nvidia and Radeon) and of course system updates to patch your system.
If a user is looking for any more than this with a distribution that's no more than 120 MB then I'm not sure what other distribution they could use except for Puppy Linux.
References
Carroll, Gerard. "Puppy Linux Forum." Puppy Linux Forum. Web. 10 Oct. 2011. <http://www.puppylinuxforum.org/>.
Carroll, Gerard. "Puppy Linux FAQ - Home." Puppy Linux FAQ - Home. Web. 10 Oct. 2011. <http://www.puppylinuxfaq.org/>.
DistroWatch. "DistroWatch.com: Puppy Linux." DistroWatch.com: Put the fun back into computing. Use Linux, BSD.. Web. 10 Oct. 2011. <http://distrowatch.com/table.php?distribution=puppy>.
Kauler, Barry. "Puppy Linux Community - Home." Welcome to puppylinux.org !. Web. 10 Oct. 2011. <http://puppylinux.org/main/Overview%20and%20Getting%20Started.htm>.
Kauler, Barry. "Puppy Linux." Puppy Linux. Web. 10 Oct. 2011. <http://puppylinux.com/about.htm>.
Part 2
Software Packaging
In Puppy Linux, software packages are installable via the built-in Puppy Package Manager either via the start menu or by using the command-line interface and typing "ppm".
There are two main software package types, identified by their file extension:
- .pet (intended for all full and frugal Puppy installations)
PET files (which stand for Puppy's Extra Treats) are actually just tarball files (tar.gz) that have an md5sum appended on the end. This allows for an integrity check after the package as been downloaded.
- .sfs (intended for all frugal or LiveDVD installations)
SFS files are a type of "package management" Puppy Linux has integrated into the boot sequence to allow combinations of packages to be loaded into the OS on boot. A user just has to download an .sfs file (for example: a "mySQL-PHP-Apache" package or a "Open Office Suite" package) and put it into the "/mnt/home" directory, run the BootManager to select which SFS files they wish to load and reboot. After rebooting, the packages are available for use right away. This allows for highly customizable software packages to satisfy a user's OS specifications.
Other software package types:
- .tar.xz or .txz (intended for all full and frugal Puppy installations)
- .pup (obsolete; superseded by .pet)
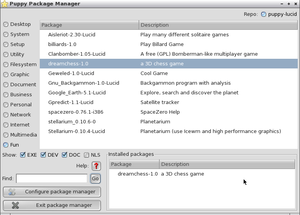
The user can use Puppy Package Manager to display a list of all the user-installed packages, although this display doesn't show all the packages that come pre-installed with the distribution.
To see all the pre-installed packages, the user would have to open the file located in the directory /root/.packages/ (with .packages being a hidden folder) and open the file "woof-installed-packages". This file lists all the packages that came with Puppy Linux. One way I got the packages in a useful text file was to run the command "cat ./packages/woof-installed-packages > packages.txt" and then viewed the new text file.
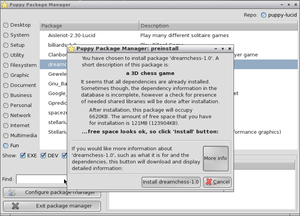
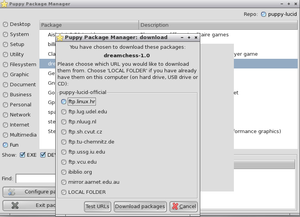
Using PPM (Puppy Package Manager), you can view or search for different packages from the Puppy repositories and are able to install them by clicking on the desired package. Once a package is installed by the user, the list of user-installed packaged gets populated. From this list, the user is able to delete one of these installed packages by clicking on the one they wish to remove.
Puppy Linux comes with software to perform equivalent functions as they do on other OS's. The table below displays a list of the equivalent software (Table 1):
| Application | Puppy Linux Bundled Software |
|---|---|
| File Manager | ROX-Filer |
| Spreadsheet | Gnumeric |
| Word Processor | AbiWord |
| Image Viewer | Viewnior |
| Graphic Editor | mtPaint |
| Vector Art Editor | InkscapeLite |
| Internet Browser | SeaMonkey |
| SeaMonkey | |
| Audio Player | Pmusic |
| Audio Editor | mhWaveEdit |
| Audio Encoder Converter | PawdioConverter |
| Video - Movie Player | GNOME MPlayer |
| Disc Burner | Pburn |
| DVD Ripper | Pdvdrsab |
| CD Ripper | Asunder |
| Personal Wiki | DidiWiki |
| IRC | Ayttm |
| FTP Utility | gFTP |
| HTML Editor | SeaMonkey |
| Personal Organizer | OSMO |
| File Compression | XArchive |
| Windows Data Recovery | ROX-Filer |
| Drive and Partition Backup | Pudd |
| Integrated Development Environment | Geany IDE |
| Text Editor | NicoEdit |
Major package versions
Listed below are the current versions of packages being run in Puppy Linux as well as the vintage and/or modification notes of the package.
- Linux Kernel - 2.6.38.4
- Vintage: Released 21 Apr 2011, latest stable kernel is 3.0.8
- Modifications: None Permitted
- Reasoning: N/A
- glibc - Ubuntu EGLIBC 2.11.1-0ubuntu7.1
- Vintage: Released 19 May 2010, latest stable version is Ubuntu EGLIBC 2.13-20ubuntu5
- Modifications: None
- Reasoning: N/A
- Syslinux 4.03
- Vintage: Released 25 Oct 2010, latest stable version is Syslinux 4.04
- Modifications: None
- Reasoning: N/A
- busybox v1.16.2
- Vintage: Released 12 June 2010, latest stable version is BusyBox 1.19.3
- Modifications: None
- Reasoning: N/A
- Bash 4.1.0
- Vintage: Released 1 Jan 2010, latest stable version is Bash 4.2
- Modifications: None
- Reasoning: N/A
- wget 1.12
- Vintage: Released 22 Sep 2009, latest stable version is Wget 1.13.4
- Modifications: None
- Reasoning: N/A
- tar 1.22
- Vintage: Released 5 March 2009, latest stable version is tar 1.26
- Modifications: None
- Reasoning: N/A
- procps 3.2.8
- Vintage: Latest stable release
- Modifications: None
- Reasoning: N/A
- grep 2.5.4
- Vintage: Released 10 Feb 2009, latest stable version is grep-2.9
- Modifications: None
- Reasoning: N/A
- who/chmod/touch/ls (GNU coreutils 7.4)
- Vintage: Released 07 May 2009, latest stable version is coreutils-8.14
- Modifications: None
- Reasoning: N/A
- Firefox 3.6.13 or Firefox 5.0.1
- Vintage: 3.6 Released 21 Jan 2010 and 5.0.1 released 21 Jun 2011. Latest stable version is 7.0.1
- Modifications: None
- Reasoning: N/A
- Seamonkey 2.3
- Vintage: Released 16 Aug 2011, latest stable version is SeaMonkey 2.4.1
- Modifications: None
- Reasoning: N/A
Initialization
Hardware Initialization
On the Puppy boot stick there are only 4 files:
vmlinuz - the usual kernel
initrd.gz - the usual initial RAM disk image
pup_xxx.sfs - contains the entire Puppy file system, from / on down (where xxx is the version number eg. pup_428 for Puppy 4.2.8)
pupsave.2fs - saves your individual files in one piece
At bootup, the first thing that happens is the Linux kernel, stored in vmlinuz, is loaded into RAM, then the init script is run. The init script loads the initial ramdisk from the file initrd.gz. The file is ".gz"-compressed, so it is uncompressed into the ramdisk and then the ramdisk becomes the very basic Puppy filesystem. The filesystem is everything under the root directory "/" with all subdirectories /bin, /sbin, /lib, /dev, /tmp, /usr, etc.
A fundamental objective of Puppy is that everything should load into ramdisk, which frees the CD drive so that you can use the CD drive for other purposes. Also, loading everything from RAM makes application startup and running speed much more efficient. This functionality allows for systems without a CD drive to load straight from USB. If a user decides to take their system off-roading and prefers to not boot off a spinning CD drive or hard disk, loading from RAM allows them to easily boot a Linux OS without worrying about the system crashing.
When booting down the system, all user content on the RAMdisk is lost. To retain your configuration changes such as email, browser history and other session settings, Puppy looks for a suitable hard drive partition, and if one is found, creates a file on it called "pupsave.2fs". It is a single file but internally is a complete ext2 filesystem, which makes it the perfect candidate for a loopback device. After creating this file Puppy mounts it as a loopback device, onto /root directory. This directory /root is your home directory where all your personal stuff goes. When you shutdown, all your user settings will be saved in this file so you can continue to run Puppy as if it was never stopped.
Software Initialization
In Puppy Linux, the scripts in /etc/init.d are executed during bootup to start services and at shutdown to stop services.
At bootup, the /etc/rc.d/rc.services script will run all executable scripts found in /etc/init.d, with the commandline parameter 'start'.
At shutdown, the /etc/rc.d/rc.shutdown script will run all executable scripts found in /etc/init.d, with the commandline parameter 'stop'.
Puppy does not have runlevels (basically because Busybox doesn't, at least that was the original reason). Normal Linux distros would have a list of services to start for each runlevel, but apart from not having runlevels Puppy also only runs a very minimum essential set of services, that most users would not want to tamper with.
- Firewall
When the firewall is installed, it will be in /etc/rc.d folder as "rc.firewall" and the file "rc.local" will have an entry to start it. "rc.local" is called from "rc.sysinit".
- Startup
When Puppy boots, the order of execution of the scripts is:
/init (in the initial ramdisk)
switch_root occurs, some content of / relocates to /initrd and the following scripts then executed:
 /etc/rc.d/rc.sysinit
   Called from rc.sysinit:
   /etc/rc.d/rc.update
   /etc/rc.d/rc.network  (as a parallel process)
   /etc/rc.d/rc.services (as a parallel process)
   /etc/rc.d/rc.country
   /etc/rc.d/rc.local    (created by rc.sysinit if doesn't exist)

 /etc/profile
Puppy doesn't use runlevels. Note, the only script listed above that is not user-editable is init, as this is pristine out of initrd.gz.
- cups
- This runs the CUPS daemon 'dbusd', required for printing. Leave this enabled unless you don't need to print.
- messagebus
- Runs the daemon 'dbusd'. DBUS is a method for applications to communicate with one another. Only certain applications use this, and most puppies are built with apps that don't. If 'messagebus' script is present, it probably means some application is installed that needs DBUS. An example is 'gecko-mediaplayer' (browser plugin) that uses DBUS to communicate with 'gnome-mplayer' (multimedia player). So, unless you know that no apps require this, leave it enabled.
- rc.acpi
- Runs the daemon 'acpid'. This is a daemon that provides certain ACPI management functions. Puppy will still work without it.
- rc.firewall
- In most puppies this scipt is actually located at /etc/rc.d. If you have Internet access then this is essential to provide protection. It doesn't actually launch any daemon, only loads kernel modules, so runtime resource usage is low. The only time that you might want to disable it is when testing the Internet connection.
- slmodem
- Runs the daemon 'slmodemd'. This provides support for some analog dialup modems. There are reports that this can conflict with sound on some PCs, so if you don't use an analog modem for Internet access, or a different modem driver, consider disabling this.
- start_cpu_freq
- This is not a daemon, it just loads kernel modules for "ondemand" CPU frequency scaling and activates it. This is desirable for modern netbooks and laptops, as it reduces power consumption and CPU temperature. If you disable this, then the CPU will run continuously at its maximum frequency, which is probably fine for desktop PCs. Note that at the time of writing, the 'start_cpu_freq' script exits immediately without activating ondemand if the PC BIOS is older than 2006 -- this is because many older CPUs don't work well with ondemand frequency scaling.
- sys_logger
- This runs the daemons 'syslogd' and 'klogd', which log kernel and application events (espcially error messages) to various log files, mostly to /var/log/messages. This can be disabled and Puppy will still work.
This next process is the first one to run during bootup and is very important.
- udev
- Runs the daemons 'udevd' and 'pup_event_frontend_d'. This is a mechanism that receives information about hardware events from the kernel, such as a USB pen drive being plugged in or removed. If you don't want automatic detection of hardware changes while Puppy is running, Puppy will still work and you will save quite a lot of CPU usage and resources -- worth considering this one on a very slow CPU. This one is different from those listed above, as 'udevd' is essential during bootup. However, it can be killed after bootup -- it involves the daemon 'udevd' and the daemon 'pup_event_frontend_d' and if disabled these two are killed when X is started. The technical description is that when X starts, /root/.xinitrc runs, which launches /sbin/pup_event_frontend_d -- look in that latter script and you will see that it reads /etc/eventmanager which has a variable 'BACKENDON' that can be set to kill udevd and pup_event_frontend_d. There is a GUI manager for this, the EventManager (see System menu), and changing the 'udev' checkbox will cause the EventManager to run.
Found in README.txt files located in /etc/init.d and /etc/rc.d
Processes
These are the processes that are started after system bootup. The argument "-ef" was used to show the STIME (start time) of each process:
sh-4.1# ps -ef
UID        PID  PPID  C STIME TTY          TIME CMD
root         1     0  0 03:13 ?        00:00:01 /bin/busybox init
root         2     0  0 03:13 ?        00:00:00 [kthreadd]
root         3     2  0 03:13 ?        00:00:00 [migration/0]
root         4     2  0 03:13 ?        00:00:00 [ksoftirqd/0]
root         5     2  0 03:13 ?        00:00:00 [events/0]
root         6     2  0 03:13 ?        00:00:00 [khelper]
root         7     2  0 03:13 ?        00:00:00 [async/mgr]
root         8     2  0 03:13 ?        00:00:00 [sync_supers]
root         9     2  0 03:13 ?        00:00:00 [bdi-default]
root        10     2  0 03:13 ?        00:00:00 [kblockd/0]
root        11     2  0 03:13 ?        00:00:00 [kacpid]
root        12     2  0 03:13 ?        00:00:00 [kacpi_notify]
root        13     2  0 03:13 ?        00:00:00 [kacpi_hotplug]
root        14     2  0 03:13 ?        00:00:00 [ata/0]
root        15     2  0 03:13 ?        00:00:00 [ata_aux]
root        16     2  0 03:13 ?        00:00:00 [kseriod]
root        18     2  0 03:13 ?        00:00:00 [kswapd0]
root        19     2  0 03:13 ?        00:00:00 [aio/0]
root        20     2  0 03:13 ?        00:00:00 [crypto/0]
root        22     2  0 03:13 ?        00:00:00 [scsi_eh_0]
root        24     2  0 03:13 ?        00:00:00 [scsi_eh_1]
root        25     2  0 03:13 ?        00:00:00 [scsi_eh_2]
root        28     2  0 03:13 ?        00:00:00 [kpsmoused]
root        92     2  0 03:13 ?        00:00:00 [ksuspend_usbd]
root        93     2  0 03:13 ?        00:00:00 [khubd]
root       132     2  0 03:13 ?        00:00:00 [usbhid_resumer]
root       136     2  0 03:13 ?        00:00:00 [aufsd/0]
root       474     2  0 03:13 ?        00:00:00 [loop0]
These processes are started during kernel threads. These next ones are started during the initialization shown above (especially "udev"):
root      5914     1  0 03:14 ?        00:00:00 /bin/sh /sbin/pup_event_backend_
root      5921     1  0 03:14 ?        00:00:00 /sbin/udevd --daemon --resolve-n
root      8080     1  0 03:15 ?        00:00:00 syslogd -m 0
root      8100     1  0 03:15 ?        00:00:00 klogd
root      8408     1  0 03:15 tty1     00:00:00 /bin/sh /usr/bin/xwin
root      8409     1  0 03:15 tty2     00:00:00 /sbin/getty 38400 tty2
root      8415     1  0 03:15 tty3     00:00:00 /sbin/getty 38400 tty3
root      8499  5921  0 03:15 ?        00:00:00 /sbin/udevd --daemon --resolve-n
root      8500  5921  0 03:15 ?        00:00:00 /sbin/udevd --daemon --resolve-n
root      8639  5914  0 03:15 ?        00:00:00 /bin/sh /sbin/pup_event_backend_
root      8640  8639  0 03:15 ?        00:00:00 /bin/sh /sbin/pup_event_backend_
root      8700  8408  0 03:15 tty1     00:00:00 /usr/bin/xinit /root/.xinitrc --
root      8701  8700  3 03:15 tty4     00:00:04 X :0 -br -nolisten tcp
root      8702     1  0 03:15 ?        00:00:00 /usr/sbin/cupsd -C /etc/cups/cup
503       8718     1  0 03:15 ?        00:00:00 /usr/bin/dbus-daemon --system
root      8731  8700  0 03:15 tty1     00:00:00 openbox
root      8749  8731  0 03:15 tty1     00:00:01 /bin/ash /sbin/pup_event_fronten
root      8814     1  0 03:15 ?        00:00:00 dhcpcd -d -I  eth0
root      8924     1  0 03:15 tty1     00:00:00 /usr/local/apps/ROX-Filer/ROX-Fi
root      9098     1  0 03:15 tty1     00:00:00 /bin/sh /usr/bin/firstrun
root      9141     1  0 03:15 tty1     00:00:00 /bin/sh /usr/sbin/delayedrun
root      9145  9141  0 03:15 tty1     00:00:00 /bin/sh /root/Startup/install-fl
root      9371     1  0 03:15 tty1     00:00:01 /usr/local/firewallstate/firewal
root      9906     1  0 03:15 tty1     00:00:00 fbpanel
root      9995     1  0 03:15 tty1     00:00:00 /bin/bash /usr/sbin/pfbpanel ref
root      9998  9995  0 03:15 tty1     00:00:00 /root/Startup/freememapplet_tray
root     10011     1  0 03:15 tty1     00:00:00 /bin/bash /usr/sbin/pfbpanel ref
root     10013 10011  0 03:15 tty1     00:00:00 /root/Startup/network_tray
root     10053     1  0 03:15 tty1     00:00:00 retrovol -hide
root     10081     1  0 03:15 tty1     00:00:00 /bin/bash /usr/sbin/pfbpanel ref
root     10083 10081  0 03:15 tty1     00:00:00 /root/Startup/powerapplet_tray
root     11701  9098  0 03:15 tty1     00:00:00 /bin/sh /usr/bin/firstrun
root     11702 11701  0 03:15 tty1     00:00:00 /bin/sh /usr/bin/firstrun
root     11703 11701  0 03:15 tty1     00:00:00 grep -E ^[A-Z][0-9A-Z]*=
root     11704 11702  0 03:15 tty1     00:00:00 gtkdialog3 -p DIALOG -c
root     12047  8924  2 03:16 tty1     00:00:01 roxterm
root     12051     1  0 03:16 tty1     00:00:00 dbus-launch --autolaunch 766be48
root     12052     1  0 03:16 ?        00:00:00 /usr/bin/dbus-daemon --fork --pr
root     12053 12047  0 03:16 tty1     00:00:00 gnome-pty-helper
root     12054 12047  0 03:16 pts/0    00:00:00 /bin/sh
root     12941  9145  0 03:17 tty1     00:00:00 sleep 4
root     12946 12054  0 03:17 pts/0    00:00:00 ps-FULL -ef
References
Kauler, Barry. "Kernel module loading." Puppy Linux. Web. 11 Nov. 2011. <http://puppylinux.com/technical/module-loading.htm>.
Kauler, Barry. "howpuppyworks.html." Puppy Linux. Web. 11 Nov. 2011. <http://puppylinux.com/development/howpuppyworks.html>.
Natarajan, Ramesh. "6 Stages of Linux Boot Process (Startup Sequence)." The Geek Stuff. Web. 11 Nov. 2011. <http://www.thegeekstuff.com/2011/02/linux-boot-process/>.
"PuppyLinux: How Puppy works." Welcome to Puppy Linux Desktop !. Web. 11 Nov. 2011. <http://pupweb.org/wikka/howPuppyWorks>.
"PuppyLinux: howPuppyWorks." Welcome to puppylinux.org !. Web. 11 Nov. 2011. <http://puppylinux.org/wikka/howPuppyWorks>.
