COMP 3000 2011 Report: Inquisitor

Part 1
Background
Name
The name of the distribution is Inquisitor.
Goals and Target Audience
This distribution aims to provide an open-source hardware testing and certification system, that is:
- Customizable: it is possible to pick and choose which modules and tests to include.
- Modular: it is made up from a series of interchangeable modules; one can easily add new modules in order to add new test detections, production steps, etc. This will be described in greater detail in later parts of the report. Please stay tuned!
- Flexible: it is possible to adjust virtually any parameter in analysis or testing process and customize the system to the widest extent possible.
- Intelligent: it is server-based version includes a database that stores all the data on all computers that were tested by Inquisitor making easy to keep track of multiple systems/PCs. If some parts of the hardware were to change, 'clever scheduler' won't redo all the long testing, but only the tests that were relevant to the hardware changes.
- Distributed: through its modular architecture, Inquisitor can be easily distributed across a cluster to distribute load or make a geographically distributed system.
- Scalable: it is possible to test just one computer or all the computers in an organization.
- Free: it is free, and that's always good!
Who Develops it
It is being developed by Mikhail Yakashin and another 5 guys, with various contributions from others, the full list of names can be found below:
Inquisitor team is:
- Mikhail Yakshin
- Pavel Melnikov
- Maksim Bartenev
- Sergey Matveev
- Denis Borovikov
- Andras Horvath
With contributions and suggestions from:
- Anton Farygin
- Anton Kachalov
- Valery Inozemtsev
- Alexandra Panyukova
- Michail Pishchagin
How To Get It
Inquisitor<ref name = "Inquisitor">Inquisitor: Inquisitor website.</ref> may be obtained via the official website. Currently it seems that only a direct download is available, but there is a heading for BitTorrent, so who knows it may also be available as an option in the future. There are several 'flavors' to choose from; there is a standalone version, a live version, and an enterprise version.
- Standalone version, installs into whatever Linux OS system you are currently running by modifying a configuration makefile with your current system parameters. This is probably the best for "demonstrating and learning Inquisitor" as stated by the people working on the distribution.
- Live version, is a Linux Live CD option that allows you to boot straight from the CD/DVD. A good choice for those that are afraid to accidentally mess something up on their system when running destructive testing and for those that don't have a Linux OS installed on their machine.
- Enterprise version, allows the user to setup a dedicated testing server that would allow any computer to boot from the network using the PXE protocol in order to test multiple computers on a regular basis.
How Large is it
The size of each of the aforementioned 'flavors' is relatively small and only took a couple of minutes to download via my connection at home. The distribution is zipped, and version 3.0 is under a megabyte in size. When unzipped it is just under 2 megabytes (1.95). The iso for the Live CD version of the distribution is 131 megabytes for 32-bit systems, and 135 megabytes for 64-bit systems.
Influences
ALT Linux is used as the base and starting point for Inquisitor.
Miscellaneous
Inquisitor uses an internal scheduling program that allows a user to schedule and run multiple tests, in a predefined order with varying parameters.
The following tests are available to run. Please refer to the API for further information and documentation on the various tests.
|
|
|
Installation/Startup
Installation
I decided to go with the Live CD 'flavor' of this distribution as it is the one that would minimize my chances of doing something I would regret to my own PC via some of the write tests that were available as part of the default package. I used VirtualBox to mount the downloaded iso, this enabled me to do some testing and play around with creating my own test cases, and packages. This was easy and straight forward.

A few installation options are described below:
Live CD
Download and save the iso (Live CD) image that is suitable for your system from the Inquisitor website. Choose a virtualization software to use.
Oracle VM VirtualBox
- Download and install VirtualBox.
- Create a new Virtual Machine by following the point and click wizard.
- Mount the Inquisitor iso, previously downloaded.
- Start the Virtual Machine with the mounted image.
- Select one of the options and have fun...
VMware
- Download and install VMware.
- Create a new Virtual Machine by following the point and click wizard.
- Mount the Inquisitor iso, previously downloaded.
- Start the Virtual Machine with the mounted image.
- Select one of the options and have fun...
Problems Encountered
None encountered.
Basic Operation
 |
 |
 |
The setup used; Oracle VM VirtualBox running a mounted Live CD copy of Inquisitor v3.0.
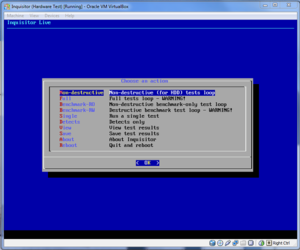
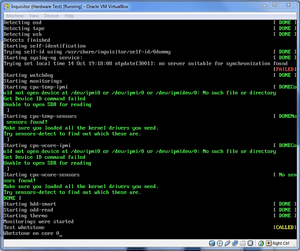
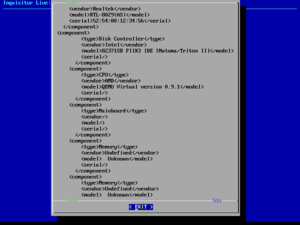
The main menu that is presented to the user directly following boot-up is straightforward and easy to use (Figure 1). All of the options are grouped into categories. Selecting and running tests is straightforward, a test is selected and ran, after it is done, the results are saved and may be viewed at any time. Everything is automatic (Figure 2), you just 'point and click' with the outcome presented as 'DONE', 'FAILED', 'SKIP', 'PASSED', and 'CALLED' - the wording is fully customizable and can be changed via a configuration file if one so desires -. Some tests require the user to enter a set of parameters that are test specific, such as the number of iterations to run through or test duration. All of the parameters are entered via a TUI textfield. Once the desired test(s) are ran, results are saved and may be viewed at any time (Figure 3).
I did not encounter any problems. Although with some of the more time consuming tests it would have been nice to see some kind of an update on what is currently happening, in order to eliminate any suspicion that the system has hung. The only other gripe I had was with the 'View test results' constantly returning me not to the menu from which I came, but to the main menu. This forces the user to go back to wherever he/she was each and every single time. Having an option to 'Exit' once everything was done would have been nice.
Usage Evaluation
From my experience I think that the distribution does everything that it had promised on it's website and then some. I found it very easy to install and come to terms with, and the ability to create and modify existing test cases was simple and fairly straight forward thanks to the provided documentation that kept things concise and not overly complicated. The basics are there, and are enough to lay the foundation for whatever test case module you may want to create provided you have some background experience in programming and know what it is that you want to do.
References
<references />