COMP 3000 2011 Report: Zentyal: Difference between revisions
| Line 221: | Line 221: | ||
</table> | </table> | ||
After I have configured my first user account on Empathy, I tried to connect to my Jabber server and got a Network error and wouldn't allow me to connect to my Jabber network. I am not exactly sure why this happened. | |||
Revision as of 23:53, 1 December 2011
Part 1
Background
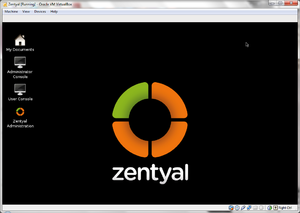
Zentyal was formerly known as the eBox Platform that is based on Ubuntu server 10.04. It is an open source unified network server software package (or unified platform) developed by a Spanish company called eBox Technologies to provide easy and affordable enterprise level computer networks to small and medium businesses in order to improve the reliability and security of their network infrastructure and because it is an open source alternative to a Windows small business server it helps reduce operational costs impressively. It provides various networking services such as acting as a gateway to enforce security access and improve efficiency to users connecting to the internet via the gateway configurations. It also provides various networking tools that pertain to the operation, administration and maintenance of network systems or unified communications server or even an office server that can manage printer sharing or file sharing.
Zentyal can be freely obtained from their site (Zentyal's Official Site) by downloading from their server. It's approximately 625,000 KB big and the file is in disk image format. You can make a purchase for additional add on or server subscriptions (in euro).
Installation/Startup
Zentyal can be installed on the main machine or on a virtual machine. Both go through the same installation process but a few more steps if you're installing on a virtual machine. If you are using VMware Player for installing Zentyal on a virtual machine, it is preferred not to use the 'easy install' method.
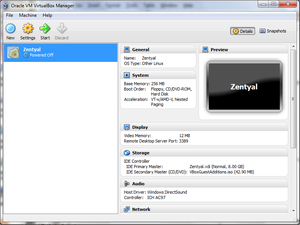
For this report, I installed it on a virtual machine using VirtualBox.

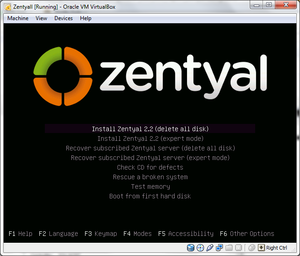
After you have successfully created a virtual machine, power it on and since this is the first time you power on your virtual machine, it will ask you what you want to boot up since there's nothing installed onto your virtual machine. You then boot up the Zentyal disk image (this is the same as popping in the CD into your CD drive but you are actually "mounting" the .iso file onto your virtual CD drive) that you downloaded from the Zentyal site.
If for some reason, you aren't prompt for that option, you can mount the file using VirtualBox instead by going to VirtualBox's menu bar and selecting Devices>CD/DVD Devices>Choose a virtual CD/DVD disk file... and browse for your Zentyal's disk image file. If your menu bar isn't shown, press "Host + C". Afterwards, reboot your virtual machine and it will automatically boot from your virtual CD drive. It will then prompt you for a language then the boot menu will be displayed. Now, You have two options for installation:
I installed Zenyal using the default mode then went through the installation process. The installation process was quick, it didn't take me a long time as it did with Ubuntu.
When I finished installing Zentyal and rebooting it, it automatically started up Firefox; this is used as a web interface that allows easy access to various networking administrative tools. There weren't many softwares installed, namely, only a few text editing programs (gedit and leafpad), an archive program, file managing program and Firefox.
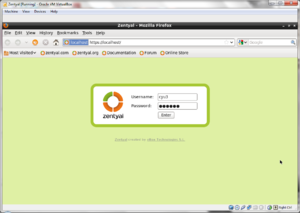 |
The first thing that shows up is the Firefox browser that asks for the Username and Password (the credentials you put in during the installation process), it will act as the user interface that will be used to set up and manage the network services.
Basic Operation
Zentyal can be used to act as a gateway to enforce access rules for internet connection or configure settings to improve efficient access to the internet (in other words, speed up the connection speed by various methods such as proxy caching or traffic shaping). So, after starting up Zentyal for the first time, you will find that there are barely anything installed.
Firefox (actually called Zentyal Administration) will automatically start up every time you start up the Linux and prompt you for credentials (username and password). The username and password are the same ones you had put in during the installation process. This web interface allows you to have access to network administrative tools and configurations as well as modules that you can install with ease.
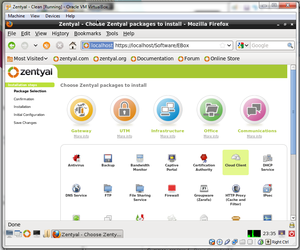 |
After the initial login, you are automatically directed to an Installation wizard as depicted above. There are many variety of modules that can be downloaded and installed. You can click on the 'More info' under each package(Gateway, UTM, Infrastructure, Office and Communications) to see which packages would be best fit for the current task. When you found the package that you want, simply click on the logo of that package, and various modules are selected automatically with regards to that package then click install.
If you decide to skip the installation process, you can do so by clicking on skip install. If you want to go back to the Installation wizard, select Software Management on the left hand side menu then select Zentyal Components. You will see a list of available modules for installation, then click on view basic mode and it will take you back when you initially start up the Zentyal Administration. Another alternative of installing modules can be done by using sudo apt.
|
Gateway: Providing system administrators the tools to configure a firewall and routing rules for multiple internet connections. It allows system administrators to increase internet speed by caching web pages and enhance security by blocking dangerous web threats. Some features that this package provides includes Transparent Caching, Load Balancing and Availability, Traffic Shaping and QoS, and Web Content Filter. |
|
UTM (Unified Threat Management): Provides system administrators tools to configure a VPN (virtual private network) to allow users to have remote access to a local area network over the internet. Some features includes Firewall, Content Filter, Virtual Private Network and Intrusion Detection. |
|
Infrastructure: Allowing system administrators to manage the network infrastructure. Some features provided in this package includes DHCP Server, Web Server (powered by Apache), DNS Server and Certification Authority that allows you to create your own certificates. |
|
Office: Allowing system administrators to manage the users or groups of users as well as the server for file and printer sharing. Some features includes Directory Services that allows you to manage your users, Groupware (similar to Microsoft Sharepoint), File and Printer Sharing, and Data Backup. |
|
Communications: Provides system administrators tools to easily configure a communication server. This package includes Email, Instant messaging using the XMPP/Jabber protocol, Groupware and VoIP. |
I found a couple of tutorials on how to configure Zentyal as a gateway, and configuring a Jabber server for instant messaging or VoIP. I decided to try to set up a Jabber server and trying to connect to that server using Empathy chat client installed on Ubuntu by following this Tutorial.
I went and installed the Communications package which has all the necessary modules to set up a Jabber server. After installing, the configuration wizard follows and you have a choice whether to configure the settings now or skip and configure later.
The setup I used were:
Configure Interface types: Internal
Network configuration for external interfaces: DHCP
Type of server: Standalone server
Setting up a virtual mail domain: Zentyal
Subscribing to Zentyal Cloud: You have a choice to subscribe or not, it's not really needed
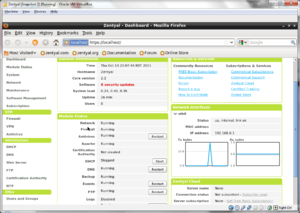
When you make any changes to the configuration, you must save changes to your modules. When you're done, go to your Dashboard, it shows the system status. The next step would be to create users. Go to the left hand menu and select Users and Groups which will show more options. Select users and enter in credentials then save changes, the user information should appear under after you press the add button:
User name: Internalfire
First name:
Last name:
Comment: optional
Password: password
Retype password: password
Now go to the left hand menu again and select Jabber. I used the following setup to set up a Jabber server:
Jabber domain: u-jabber.com
SSL support: Allow SSL
Enable MUC is checked
Setting up the server is finished. I proceeded to test the Jabber server by setting up a chat client on Ubuntu using the Empathy chat client. For the user account, I used the following setup:
Account: Internalfire@u-jabber.com
password: password
Encryption required is checked
Ignore SSL certification errors is checked
Server IP: The IP under eth0 from your Zentyal dashboard
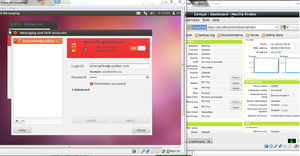 |
After I have configured my first user account on Empathy, I tried to connect to my Jabber server and got a Network error and wouldn't allow me to connect to my Jabber network. I am not exactly sure why this happened.
 |
Usage Evaluation
Zentyal is a good distribution with regards in managing networking or server activities. It is made to ease the configurations for both network and server settings as well as setting them up quickly. Although, having a necessary amount of knowledge about networking principles would be required to use Zentyal as well as optimizing the use of the features available.
It was a bit cumbersome for me to set up a simple instant messaging server and network activity monitoring system because I only had a limited amount of understanding of networking principles as well as I needed to install other components from Ubuntu. There are variety of tutorials that can be found on the internet but it would be better to have a good general understanding of how networks or server works, even though Zentyal provided a web interface, it is likely that it is not as flexible as configuring settings using a terminal.
Part 2
Software Packaging
Zentyal is built on top of Ubuntu which is derived from Debian. Zentyal's packaging format is .deb and the utility that manages its packages is dpkg (package management for Debian). It also includes a RPM (Red Had Package Manager) package manager that manages .rpm format files but will focus on dpkg since packages are mainly in .deb format.
Commands:
 dpkg -l will display a list of packages
 dpkg -r will remove an installed package
 dpkg -i will install a package
Major Package Versions
There are a wide range of packages installed in Zentyal. But I've only chosen a few of them out of the list for a more detailed description.
|
current version: 4.1-2ubuntu3 |
source: http://www.gnu.org/software/bash/ |
|
|
current version: 1.5.28ubuntu4 |
source: http://kitenet.net/programs/debconf/ |
|
| current version: 1.15.5.6ubuntu stable release: 1.15.72 |
source: http://www.debian.org/doc/FAQ/ch-pkgtools.en.html |
|
| current version: 1.13.3-1ubuntu11 stable release: 1.19.22 |
source: http://www.busybox.net/ |
|
| current version: 3.6.23+build+ stable release: 8.0 |
source: http://www.firefox.com/ |
|
| current version: 3.4.10-1ubuntu stable release: 3.5.0 |
source: http://www.openbox.org/ |
|
| current version: 0.5.0-3ubuntu2 stable release: 0.5.0-4ubuntu3 |
source: http://lxde.org/ |
|
| current version: 1.89-3ubuntu2 stable release: 1.10 |
source: http://nc110.sourceforge.net/ |
|
| current version: 2.2.14-5ubuntu stable release: 2.2.21 |
source: http://httpd.apache.org/ |
|
| surrent version: 1:7.5+5ubuntu1 stable release: 1.11.2 |
source: http://www.x.org/ |
Initialization
Here is a high level description of how the distribution boots up. It follows the general boot up sequence for any other Unix/Linux but the only differences are the types of programs that start up during initialization.
1. BIOS
The first thing that starts up is the BIOS (which stands for basic input/output system) which performs system integrity checks or hardware startup tasks. Once hardware is started correctly, it will look for the boot loader program then load it onto memory and then BIOS will pass control to the boot loader program by executing it.
2. MBR
MBR (which stands for Master Boot Record) is a partition boot sector, this is located in the first sector of the bootable disk (it is less than 512 bytes in size). It loads and executes GRUB boot loader.
3. GRUB
The GRUB boot loader (which stands for Grand Unified Bootloader) has information about the filesystem. It will load and execute the default kernel and initrd images. Initrd (stands for Initial RAM Disk) is used to temporarily store the root filesystem by the kernel until the real filesystem is mounted. It contains important drivers for hardware usage.
4. Kernel
The kernel mounts the root filesystem then executes the init program. Since init is the first thing that the kernel executes, it has the PID of 1.
 $ ps  -ef|grep init
 root	1	 0	0	17:41	?	00:00:00 /sbin/init
 1000	1954	 1927	0	19:11	pts/1	00:00:00 grep --color=auto init
5. Init
The init program will look in /etc/cron.d file (since cron handles upstart) to decide the linux run level in order to identify the default initlevel to load necessary programs.
6. Runlevel Programs
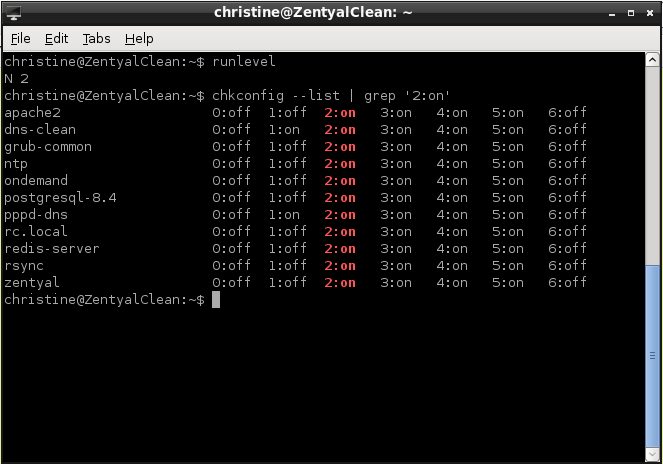
When the system is booting up, various programs are started, you can check by typing in chkconfig --list | grep '2:on' since 2 is the current runlevel as seen on the figure below (you can check by typing in runlevel). You may need to install chkconfig by typing in sudo-get install chkconfig since it's not installed on Zentyal yet.
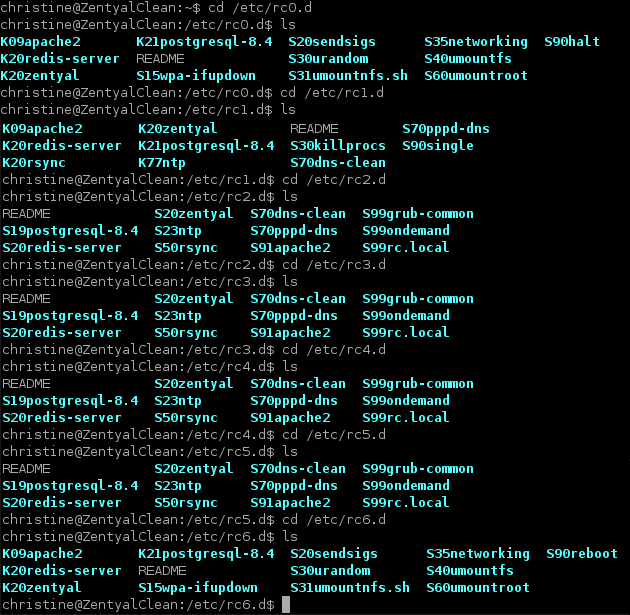
To figure out to see which programs start first you can go into the /etc/rc*.d/ directories. These sorts which programs to start (names that start with S) and end (names that start with K) first by assigning a number after the letters S or K.
From the figure above, the following programs starts in order:
- apache2 with sequence number 09
- wpa-ifupdown with sequence number 15
- postgresql-8.4 with sequence number 19
- sendsigs with sequence number 20
- etc...
Additional Information
There are log files for Zentyal which contains all the information regarding this linux distribution such as programs that are running, which utilities were used and boot information. These files can be found in the /etc directory.
References
http://www.linuxquestions.org/questions/linux-newbie-8/how-to-check-kernal-version-90413/. Accessed on 11/02/2011
http://www.howtogeek.com/howto/linux/show-the-list-of-installed-packages-on-ubuntu-or-debian/. Accessed on 11/02/2011
http://en.wikipedia.org/wiki/Zentyal. Accessed on 11/02/2011
http://www.thegeekstuff.com/2011/02/linux-boot-process/. Accessed on 11/02/2011
http://www.yolinux.com/TUTORIALS/LinuxTutorialInitProcess.html. Accessed on 11/03/2011
http://distrowatch.com/table.php?distribution=zentyal. Accessed on 11/05/2011
http://en.wikipedia.org/wiki/List_of_software_package_management_systems. Accessed on 11/05/2011
http://forums.techarena.in/operating-systems/1228021.htm. Accessed on 11/05/2011
http://www.ghacks.net/2009/02/16/learning-linux-log-files/. Accessed on 11/05/2011
http://en.wikipedia.org/wiki/Initrd. Accessed on 11/05/2011
http://en.wikipedia.org/wiki/Upstart. Accessed on 22/05/2011
http://www.cyberciti.biz/faq/linux-default-services-which-are-enabled-at-boot/ - Accessed on 11/11/2011
http://www.gnu.org/software/bash/manual/bashref.html - Accessed on 11/11/2011
http://www.distrowatch.com/table.php?distribution=zentyal. Retrieved 2011-10-12
http://www.zentyal.org/. Retrieved 2011-10-12
http://www.howtoforge.com/zentyal-as-a-gateway-the-perfect-setup. Retrieved 2011-10-13
http://www.unix-tutorials.com/go.php?id=4510. Retrieved 2011-10-15
http://www.unix-tutorials.com/go.php?id=4237. Retrieved 2011-10-15
http://www.zentyal.com/en/server/gateway/. Retrieved 2011-10-17
http://www.zentyal.com/en/server/utm/. Retrieved 2011-10-17
http://www.zentyal.com/en/server/infrastructure/. Retrieved 2011-10-17
http://www.zentyal.com/en/server/office/. Retrieved 2011-10-17
http://www.zentyal.com/en/server/communication/. Retrieved 2011-10-17
